
In the spirit of wilderness, backcountry tripping and expeditions the Muskoka River X will require traditional forms of navigation. Navigation will occur solely by map and compass. Maps will be provided to teams in the race package and are the only maps permitted on the course. There will be no course markings on the maps. Upon registration, each team will receive the required 1:50000 and 1:25000 topographic maps of the course, as well as course instructions. The course instructions will provide narrative detail of the course, along with 6 and 8-digit UTM grid coordinates associated with various waypoints and obstacles. After receiving the course instructions and maps, teams will then review the course instructions and plot their planned route on the maps. It is the responsibility of each team to correctly plot the coordinates on the map as well as determine the route that the team wishes to take. Teams will then use their route as plotted on their map to navigate the entire race course, using only the map and compass. Now, for some of you this may sound intimidating. In actuality, the navigation requirements are quite straightforward and with some practice no one should get hopelessly lost.
For the most part, traveling during daylight will be straightforward with teams relying primarily on “line of site” navigation, with intermittent compass checks. For example, as you leave a river and enter a lake you look at your map that tells you to paddle east, as far as you can go, into a bay. At the end of the bay there is a river, which you want to follow. So, after you establish your physical orientation with a rough compass check you visually establish your preferred route using obvious land features, cross-referenced with features indicated on the map. You orient your boat east and paddle east. You keep checking for the various land features that tell you where you are on the map. Eventually, you reach the end of the lake and you make your way into the bay. Once in the bay you will visually locate the entrance to the river you want to travel along. In this way, navigation is quite effective in making sure you get where you want to go. With line of sight, essentially you look at the map, look at the land features around you, and “follow your nose”. A little bit of compass work required, line of site navigation will form the majority of the race during day light hours.
This will change however when night falls. Anyone who has needed to navigate in the dark using a map and compass knows how disorienting it is. Because it is quite challenging to rely on land features for reference points in the dark you are placed in a position of needing to trust your maps, route coordinates, and compass. When paddling across open water at night, distances are hard to estimate, shorelines are challenging to follow and land features can all but disappear. If it is cloudy and there is no moonlight or if the fog settles in then it really is only you, your map and your compass. With that in mind, here are the basics that you will need to know in order to plot UTM coordinates on a topographic maps, as well as the basics for plotting a route and using a compass.
UTM Coordinates and Topo Maps (1:50000)
- Topographic maps are broken up into squares.
- Each side of each square is numbered, with numbers indicated along the sides of the map.
- When a horizontal and vertical number are combined (where they intersect), they form a 6 digits UTM coordinate.
- The 1st3 numbers of the UTM coordinate relate to “west to east”. The last 3 numbers of the UTM coordinate relate to “south to north”.
- Each grid (square) is exactly 1km by 1km (2 cm by 2cm)
- 1cm = 0.5km and 5mm=0.25km.
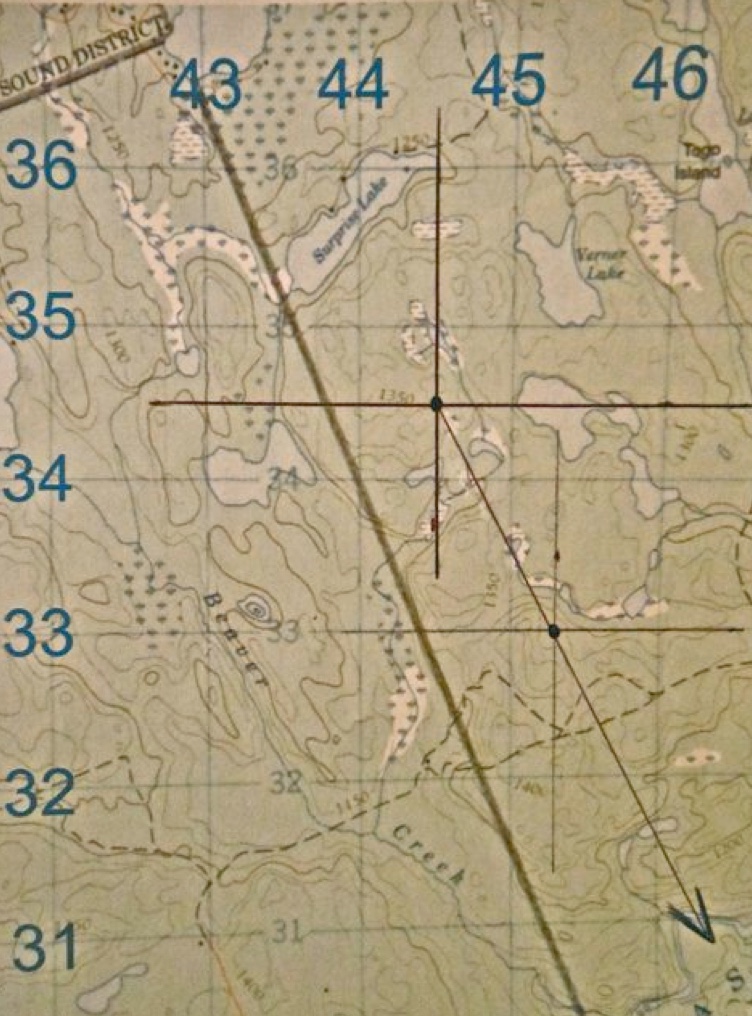
- Example of UTM numbering is seen in the map below with the numbering sequences of 43-44-45-46 representing a “west to east” orientation and the 33-34-35-36 sequences representing a “south to north” orientation.
- A 6-digit UTM representing the west-east number by the south-north numbering is seen in the example of 445345, as represented by the dot on the map.
- In this example, the first two numbers, 445345, tell you the west-east line to follow. The fourth and fifth numbers, 445345, tell you the south-north line to use. Each grid (square) is broken up into 1/10ths both west-east and south-north. The third and sixth number, 445345, represent the 1/10thfraction of the 2cm by 2cm square. In this example, each “5: equals 1cm west-east by 1cm south-north, or ½ of the square.
- Therefore, place a ruler west-east. Locate the 44thline and then divide the square in half by 1/10ths, moving towards the 45ths line. At 5/10th (1cm) make a mark on the map. Draw a south-north line on the map crosses over the mark you just made. Now, place the ruler south-north along the 34thline. Divide this square in half by 1/10ths, moving towards the 35thline. At 5/10th (1cm) make a mark on the map. Draw a west-east line cross this dot. Where the two lines cross each other is where the UTM location is. Congratulations! You have just plotted a UTM Coordinate.
- Repeat the above process for UTM 453330.
- Draw a line from point A (445345) through point B (453330). You have just plotted two UTM coordinates and a direction of travel between them. Now your task is to confirm the compass heading.
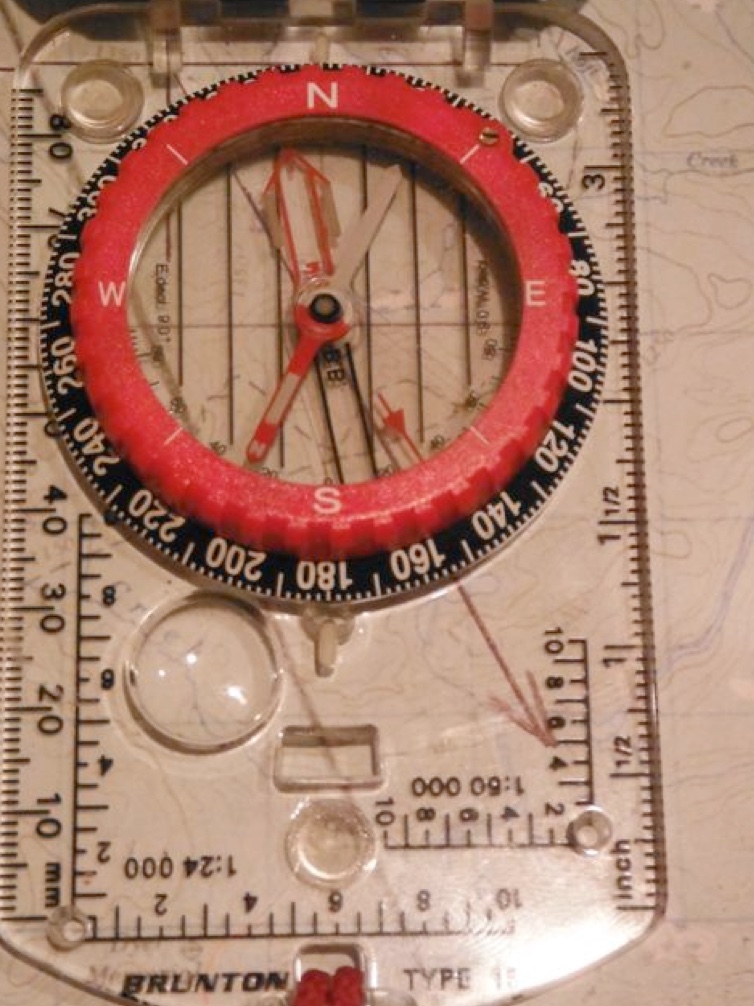
Compass Heading – First Method
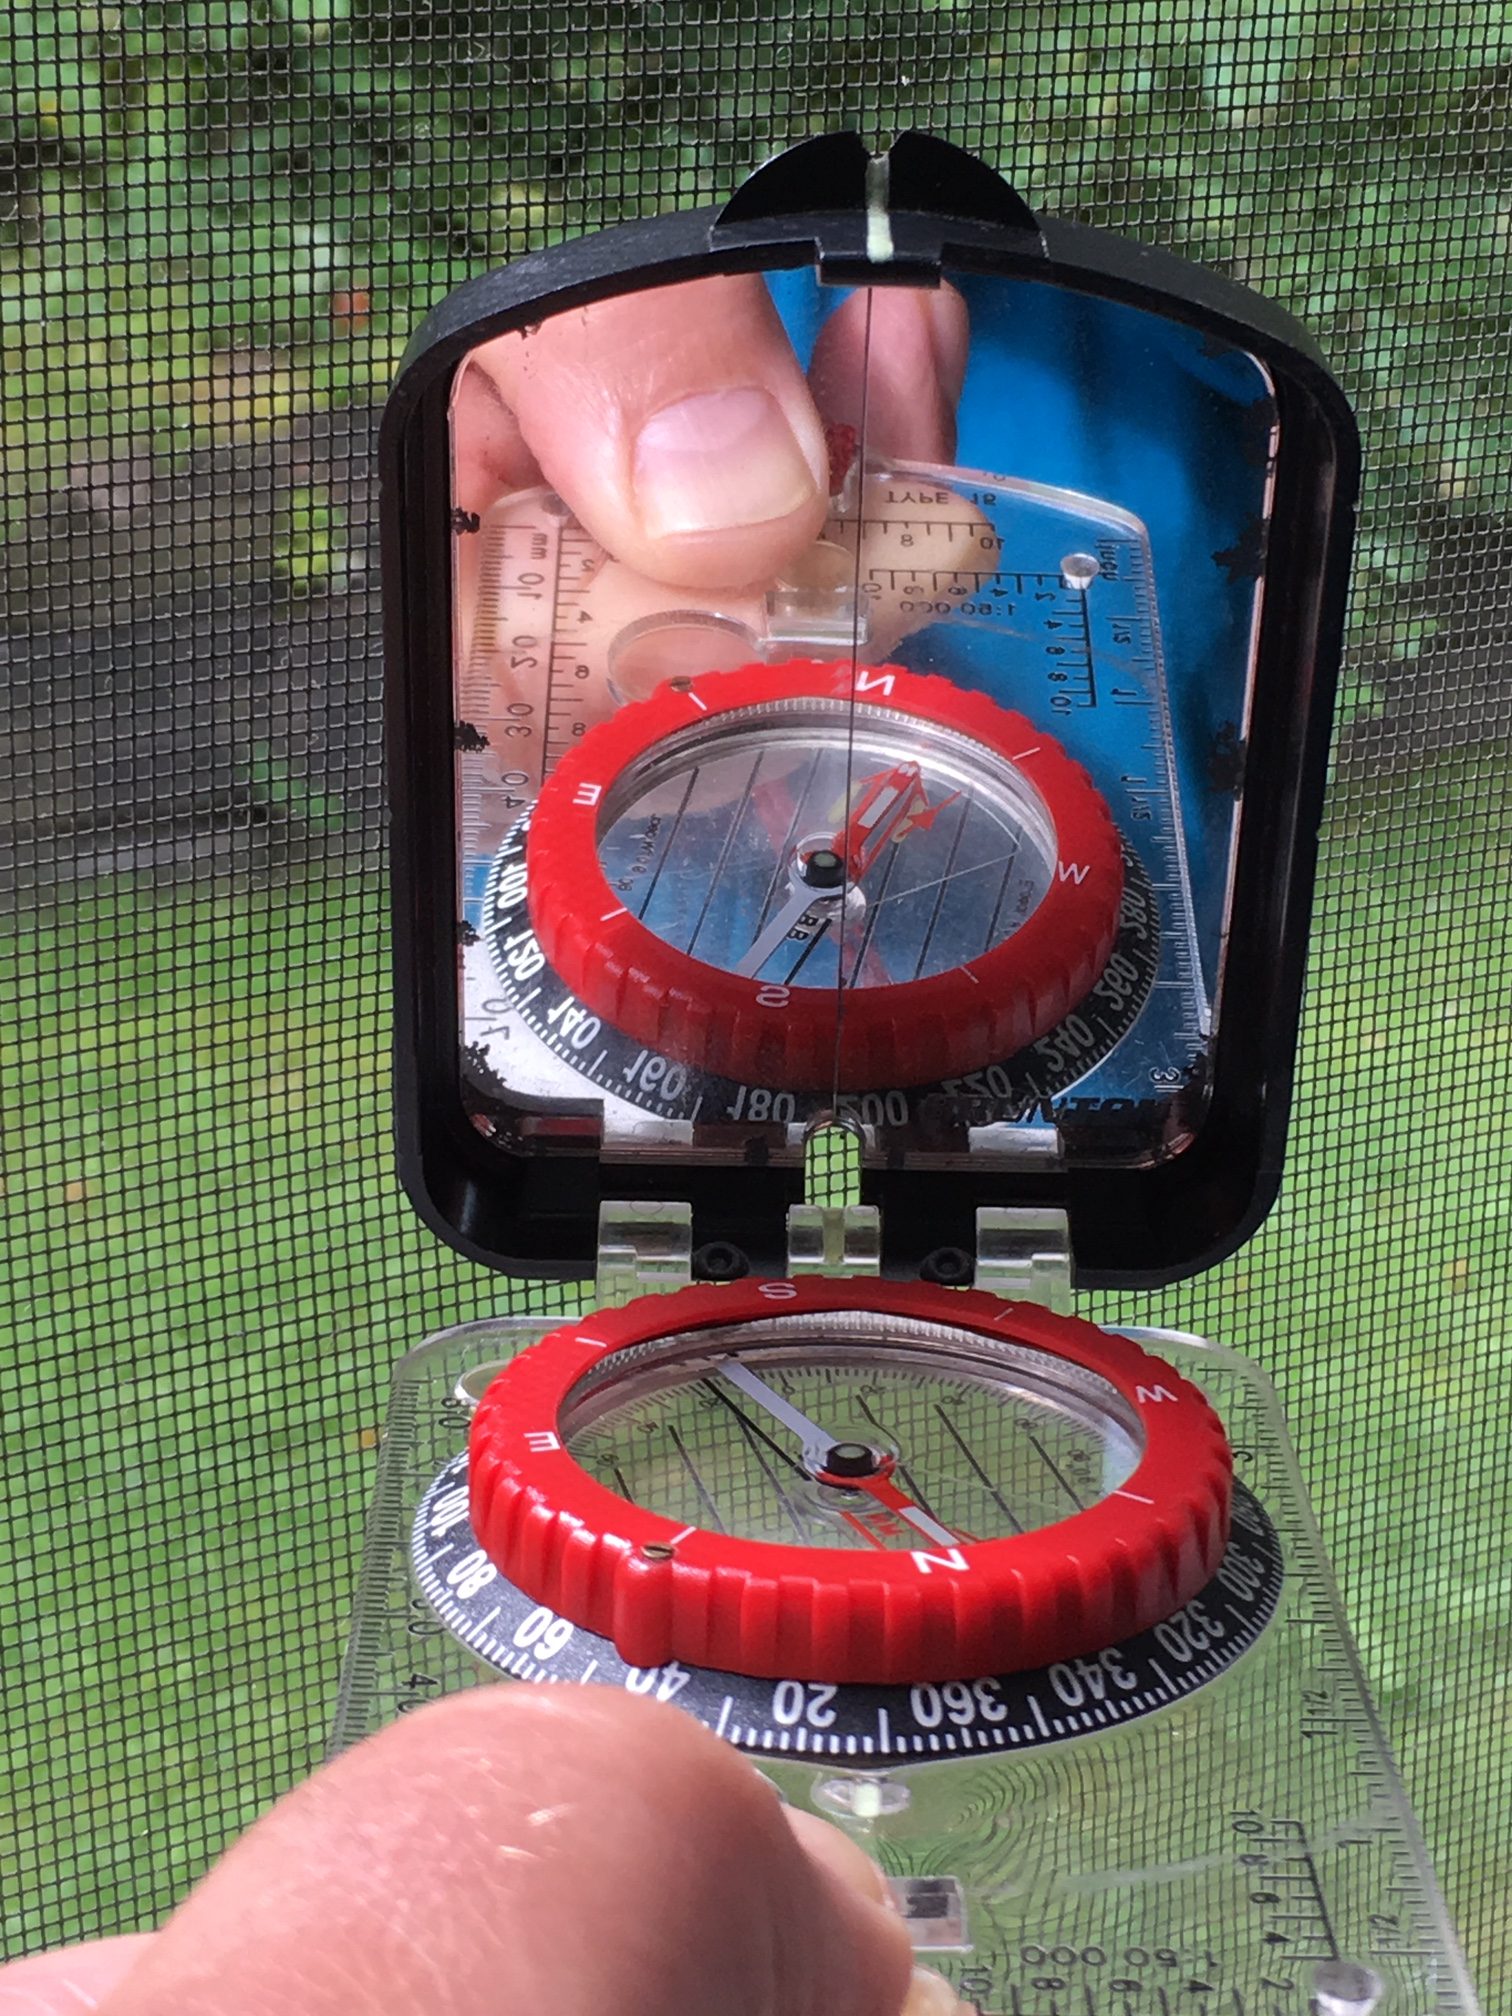
- Take your compass and turn the dial so the dial is facing north. (In the photo below, my compass has the declination pre-set which is why the “arrow” is not true north. More on declination later. This won’t affect your immediate task.)
- Place the compass on the map so the compass grid lines are matched with the topo grid lines in a north orientation. Make sure the direction of travel goes through the center point of the compass.
- Your compass bearing is the direction where the line crosses the compass, in the direction of point B.
- In this example, the route that is mapped out is bearing 154 degrees true north.
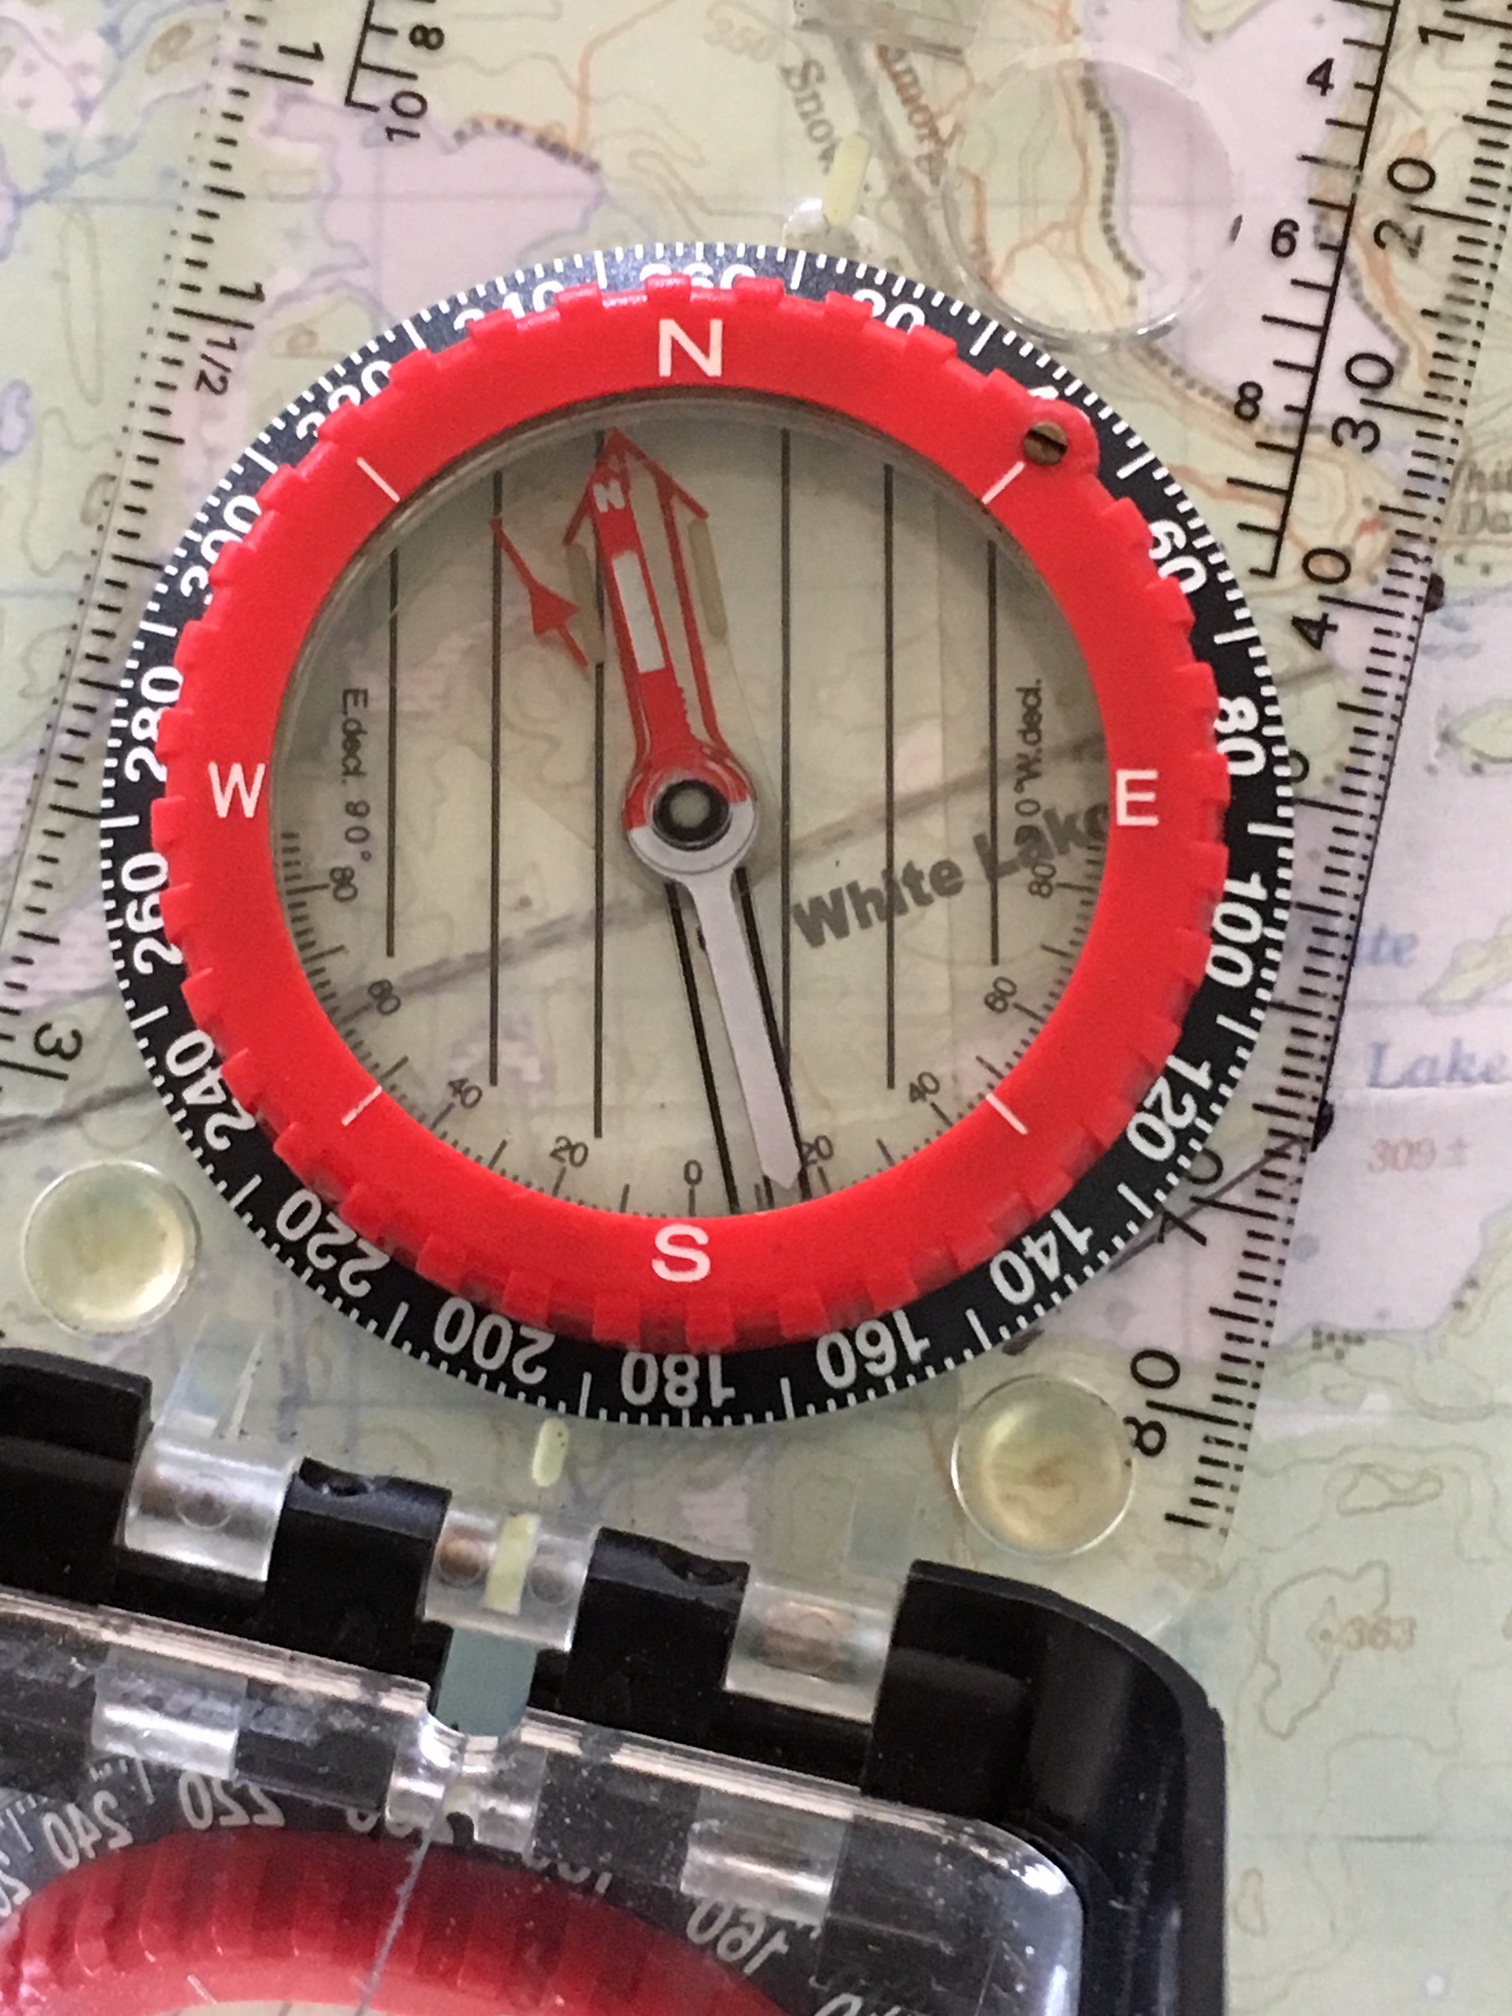
Compass Heading – Second Method
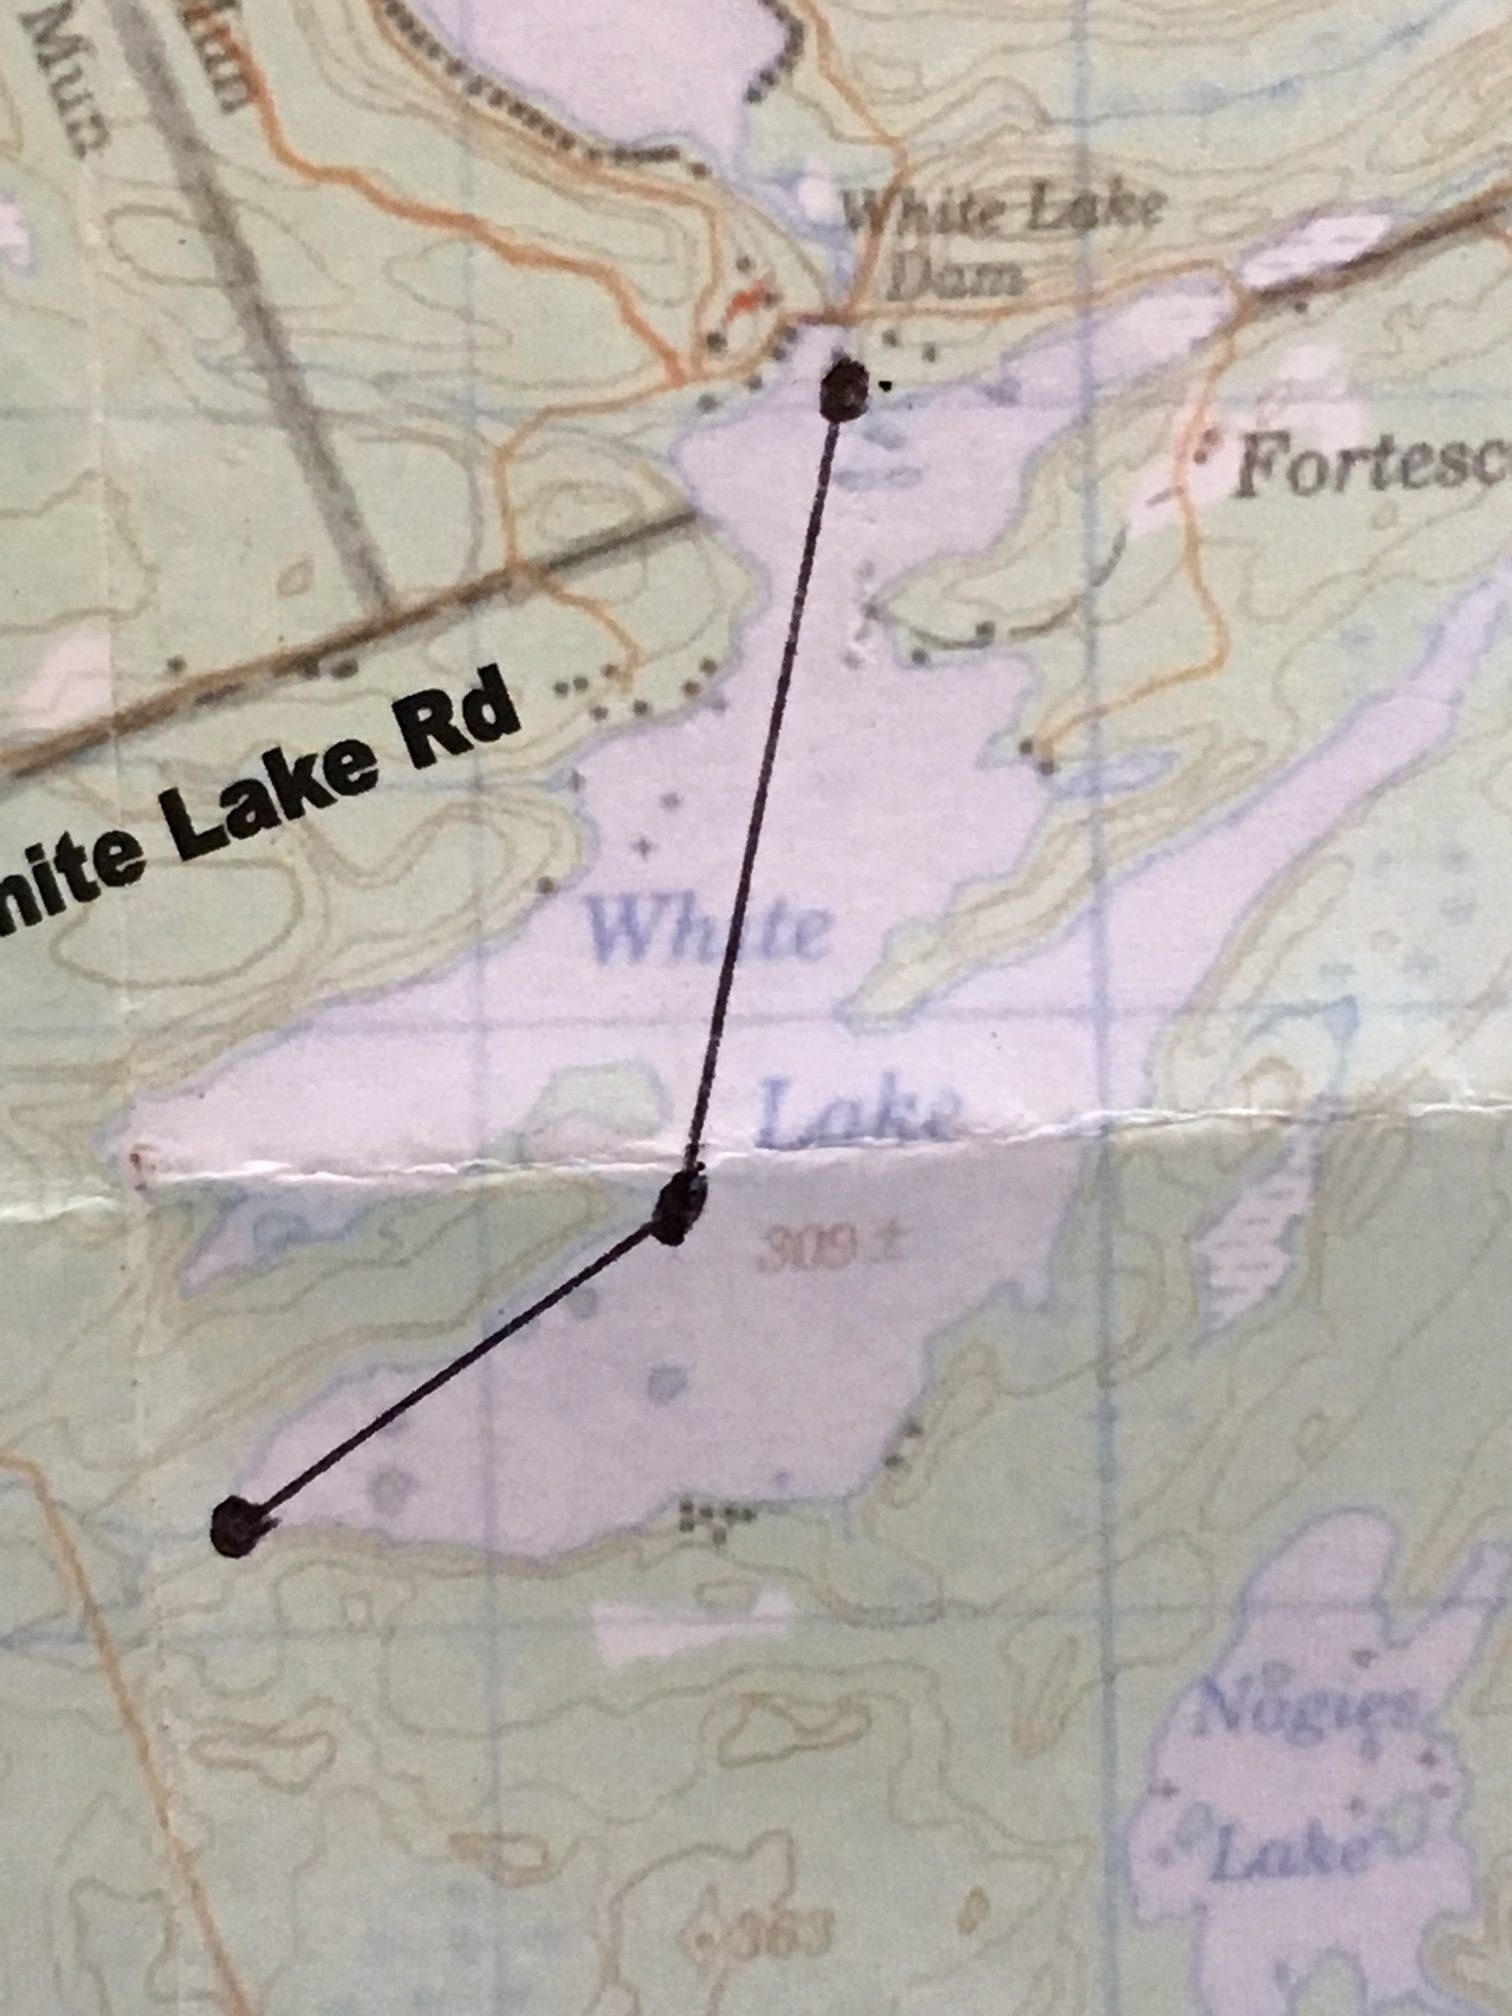
- Mark your locations on the map (e.g., White Lake Dam south to point of land)
- Place the compass straight edge along the direction of travel, oriented in the direction of travel from the starting location to the destination. (In the photo below, my compass has the declination pre-set which is why the “arrow” is not true north. More on declination later. This won’t affect your immediate task.)
- Turn the compass dial so that the lines inside the compass dial are aligned with the grid lines of the map, with the dial in north orientation.
- In this example, the route that is mapped out is bearing 192 degrees true north.
True North vs Magnetic North: Using Your Compass
Without getting into too many technicalities, north on your compass is not actually north. Because of the magnetic field, the needle in your compass gets pulled west or east depending on where you are located on the earth. When your compass needle is pointing north, it is pointing towards “magnetic north” and not “true north”. “True north” is the real north that you want to be heading towards as it is the north that is represented by the grids on your map. The difference between “magnetic north” and “true north” is called declination. In Muskoka, the “declination” is roughly 11 degrees West of true north. (It changes slightly every year and we mark the declinations on our maps.) When you want to travel 0 degrees north, your compass will actually be pointing 11 degrees west. If you do not make an adjustment for this you will travel 11 degrees west of your destination and in the wrong direction. The longer the distance you are travelling the more significant the navigation error will be. To understand how to account for this, I recommend watching this great 14 minute video that explains declination in a very simple way and how to adjust your compass heading.
http://www.youtube.com/watch?v=V0Q-FBwsBT8
So, after watching the video, you now recognize that the actual compass bearing of 0 degrees north, adjusted for 11 degrees West declination is actually 11 degrees on your compass.
When using your compass to travel 0 degrees north, make your adjustment on your compass to account for the declination. Hold your compass flat at face level and look down the compass so that the needle aligns with the North arrow: If you have a mirrored compass (which I recommend), fold the mirror towards you so that the reflection in the mirror is that of the compass face. The direction that the compass is pointing is the direction that you want to travel. It’s that easy! Hints: Mirrored compasses also have sighting marks on the folding mirror, making it easier to landmark your destination more accurately. Also, I recommend purchasing a compass that has an adjustment for declination. In this way, you adjust your compass to account for the declination in advance and then use true north bearings on your compass for navigation instead of having to do manual adjustments every time you take a bearing. It’s worth the extra few dollars.
A few last pointers: Traveling on water is like flying in a plane. You can maintain the proper compass heading but wind and waves can still move you off course. Don’t forget to account for weather conditions and adjust your heading accordingly. Finally, PRACTICE BEFORE THE RACE.
Recent Comments